博文

目前显示的是 2019的博文

新版Trojan官方脚本手動純净安裝科學上網服務器,配置TLS1.3+NGINX+偽站2019.12.29指令小結

安裝環境 VPS平臺digitalocean 操作系統debian10.2 一、新建VPS並做好cloudflare解析(略) 二、常用軟件包,增加了XZ包 #apt-get -y update && apt-get -y install unzip zip wget curl  nano sudo ufw socat ntp ntpdate gcc git xz-utils 三、BBR加速 修改系统变量 echo "net.core.default_qdisc=fq" >> /etc/sysctl.conf echo "net.ipv4.tcp_congestion_control=bbr" >> /etc/sysctl.conf 保存生效 sysctl -p 查看内核是否已开启BBR #lsmod | grep bbr 返回值有 tcp_bbr 模块即说明 bbr 已启动 四、安裝NGINX和僞裝站點 #apt install -y nginx #systemctl stop nginx 安装伪站 #wget https://github.com/mikewubox/mikewubox.github.io/archive/master.zip #unzip master.zip #cp -rf mikewubox.github.io-master/* /var/www/html nginx配置文件 #nano  /etc/nginx/conf.d/trojan.conf 參考 https://github.com/mikewubox/V2Ray3/tree/master/trojan 五、安裝trojan #bash -c "$(curl -fsSL https://raw.githubusercontent.com/trojan-gfw/trojan-quickstart/master/trojan-quickstart.sh)" 配置服務端 nano /usr/local/etc/trojan/config.json 參考 https://github.com/mikewubox/

快速一键安装TROJAN+TLS+NGINX+伪站@LinodeCentos8指令小结2019.12.28

安裝環境 VPS平臺LINODE 操作系統CENTOS8 一、新建VPS並做好cloudflare解析(略) 二、停止防火墙并安装scoat軟件包 #systemctl stop firewalld.service #yum install -y socat 三、BBR加速 修改系统变量 #echo "net.core.default_qdisc=fq" >> /etc/sysctl.conf #echo "net.ipv4.tcp_congestion_control=bbr" >> /etc/sysctl.conf 保存生效 #sysctl -p 查看内核是否已开启BBR sysctl net.ipv4.tcp_available_congestion_control sysctl net.ipv4.tcp_congestion_control #lsmod | grep bbr 返回值有 tcp_bbr 模块即说明 bbr 已启动 四、一键脚本,原作者 https://www.atrandys.com/2019/1963.html #curl -O https://raw.githubusercontent.com/atrandys/trojan/master/trojan_centos7.sh && chmod +x trojan_centos7.sh && ./trojan_centos7.sh 五、下载客户端并启动 浏览器默认设置127.0.0.1:1080 六,防火墙 启动 # systemctl start firewalld # systemctl enable  firewalld 开启端口 #firewall-cmd --zone=public --add-port=22/tcp --permanent #firewall-cmd --zone=public --add-port=443/tcp --permanent #firewall-cmd --zone=public --add-port=80/tcp --permanent #firewall-cmd --zone=p

V2Ray官方脚本科學上網最佳配置三件套nginx+ws+tls+mKCP,兼具速度&穩定&安全2019.12.24指令小結

安裝環境 VPS平臺digitalocean 操作系統debian10.2 一、新建VPS並做好cloudflare解析(略) 二、常用軟件包 #apt-get -y update && apt-get -y install unzip zip wget curl  nano sudo ufw socat ntp ntpdate gcc git 三、BBR加速 修改系统变量 echo "net.core.default_qdisc=fq" >> /etc/sysctl.conf echo "net.ipv4.tcp_congestion_control=bbr" >> /etc/sysctl.conf 保存生效 sysctl -p 查看内核是否已开启BBR #lsmod | grep bbr 返回值有 tcp_bbr 模块即说明 bbr 已启动 四、安裝NGINX和僞裝站點 #apt install -y nginx #systemctl stop nginx 安装伪站 #wget https://github.com/mikewubox/mikewubox.github.io/archive/master.zip #unzip master.zip #cp -rf mikewubox.github.io-master/* /var/www/html 五、安裝V2Ray #bash <(curl -Ls https://install.direct/go.sh) 六、安裝TLS證書 #curl  https://get.acme.sh | sh 安装成功后执行 source ~/.bashrc 以确保脚本所设置的命令别名生效。 生成ECC证书: #sudo ~/.acme.sh/acme.sh --issue -d ZZZ007.ml --standalone -k ec-256 将ECC证书和密钥安装到 /etc/v2ray 中 #sudo ~/.acme.sh/acme.sh --installcert -d ZZZ007.ml --fullchainpath /etc/v2ray/v

V2Ray官方脚本手多用戶多端口多協議安裝2019.12.19指令小結

安裝環境 VPS平臺digitalocean 操作系統debian10.2 一、新建VPS(略) 二、常用軟件包 #apt-get -y update && apt-get -y install unzip zip wget curl  nano sudo ufw socat ntp ntpdate gcc git 三、BBR加速 修改系统变量 echo "net.core.default_qdisc=fq" >> /etc/sysctl.conf echo "net.ipv4.tcp_congestion_control=bbr" >> /etc/sysctl.conf 保存生效 sysctl -p 查看内核是否已开启BBR #lsmod | grep bbr 返回值有 tcp_bbr 模块即说明 bbr 已启动 四、v2ray安裝&配置 #bash <(curl -Ls https://install.direct/go.sh) #nano  /etc/v2ray/config.json 配置參考(UUID,端口請修改) https://github.com/mikewubox/V2Ray3/tree/master/MultiV2Ray 五、啓動V2Ray #systemctl enable v2ray # systemctl start v2ray #systemctl status v2ray 六、設置云防火墻 開啓常用端口(開22端口TCP,80端口TCP,443端口TCP,53端口TCP,UDP) 開啓V2ray端口

答網友問:如何給github上的僞裝網站添加自己的域名2019.12.16

一、為域名添加4個A記錄 185.199.108.153 185.199.109.153 185.199.110.153 185.199.111.153 添加1個CNAME解析 www 二、把域名添加到github 倉庫的setting.

V2Ray官方脚本手動純净安裝WebSocket+TLS+BBR2019.12.14指令小結

安裝環境 VPS平臺digitalocean 操作系統debian10 一、新建VPS,注冊域名並解析好(略) 二、常用軟件包 #apt-get -y update && apt-get -y install unzip zip wget curl  nano sudo ufw socat ntp ntpdate gcc git 三、v2ray安裝&配置 #bash <(curl -Ls https://install.direct/go.sh) #nano  /etc/v2ray/config.json 配置參考 https://github.com/mikewubox/V2Ray3 四、TLS證書 #curl  https://get.acme.sh | sh 安装成功后执行 #source ~/.bashrc 以确保脚本所设置的命令别名生效。 生成ECC证书: #sudo ~/.acme.sh/acme.sh --issue -d ggg777.ml --standalone -k ec-256 将ECC证书和密钥安装到 /etc/v2ray 中 #sudo ~/.acme.sh/acme.sh --installcert -d ggg777.ml --fullchainpath /etc/v2ray/v2ray.crt --keypath /etc/v2ray/v2ray.key --ecc 查看证书位置 find / -name *ggg777* 五、加速優化 BBR 修改系统变量 echo "net.core.default_qdisc=fq" >> /etc/sysctl.conf echo "net.ipv4.tcp_congestion_control=bbr" >> /etc/sysctl.conf 保存生效 sysctl -p 查看内核是否已开启BBR sysctl net.ipv4.tcp_available_congestion_control sysctl net.ipv4.tcp_congestion_control #lsmod | grep bbr 返回值有

V2Ray官方脚本手動純净安裝HTTP2+TLS+BBR2019.12.13指令小結

安裝環境 VPS平臺digitalocean 操作系統debian10 一、新建VPS,注冊域名並解析好(略) 二、常用軟件包 #apt-get -y update && apt-get -y install unzip zip wget curl  nano sudo ufw socat ntp ntpdate gcc git 三、v2ray安裝&配置 #bash <(curl -Ls https://install.direct/go.sh) #nano  /etc/v2ray/config.json 配置參考 https://github.com/mikewubox/V2Ray3 四、TLS證書 #curl  https://get.acme.sh | sh 安装成功后执行 #source ~/.bashrc 以确保脚本所设置的命令别名生效。 生成ECC证书: #sudo ~/.acme.sh/acme.sh --issue -d ggg777.ml --standalone -k ec-256 将ECC证书和密钥安装到 /etc/v2ray 中 #sudo ~/.acme.sh/acme.sh --installcert -d ggg777.ml --fullchainpath /etc/v2ray/v2ray.crt --keypath /etc/v2ray/v2ray.key --ecc 查看证书位置 find / -name *ggg777* 五、加速優化 BBR 修改系统变量 echo "net.core.default_qdisc=fq" >> /etc/sysctl.conf echo "net.ipv4.tcp_congestion_control=bbr" >> /etc/sysctl.conf 保存生效 sysctl -p 查看内核是否已开启BBR sysctl net.ipv4.tcp_available_congestion_control sysctl net.ipv4.tcp_congestion_control #lsmod | grep bbr 返回值有

V2Ray官方脚本三件套手動安裝,基於Apache偽站點+WS+TLS+CDN2019.12.06指令小結

安裝環境 VPS平臺digitalocean 操作系統debian10 一、新建VPS,注冊域名並解析好(略) 二、常用軟件包 #apt-get -y update && apt-get -y install unzip zip wget curl  nano sudo ufw socat ntp ntpdate gcc git 三、安裝Apache 安裝主文件 #apt install -y apache2 # 开启以下module #a2enmod ssl proxy proxy_wstunnel proxy_http rewrite headers 停止apache2,不停會占用80端口,影響證書申請 #systemctl stop apache2 偽站安裝 #wget https://github.com/jpalidev/jpalidev.github.io/archive/master.zip #unzip master.zip #cp -rf jpalidev.github.io-master/* /var/www/html 配置 Apache #nano /etc/apache2/sites-available/v2ray.conf 四、安裝V2RAY #bash <(curl -Ls https://install.direct/go.sh) 配置文件 #nano /etc/v2ray/config.json 五、TLS證書 #curl  https://get.acme.sh | sh 安装成功后执行 #source ~/.bashrc 以确保脚本所设置的命令别名生效。 生成ECC证书: #sudo ~/.acme.sh/acme.sh --issue -d ggg777.ml --standalone -k ec-256 将ECC证书和密钥安装到 /etc/v2ray 中 #sudo ~/.acme.sh/acme.sh --installcert -d ggg777.ml --fullchainpath /etc/v2ray/v2ray.crt --keypath /etc/v2ray/v2ray.key --ecc 查看证书位

V2Ray官方脚本三件套手動安裝,基於Caddy偽站點+WS+TLS+CDN2019.11.26指令小結

安裝環境 VPS平臺digitalocean 操作系統debian10 一、新建VPS,注冊域名並解析好(略) 二、常用軟件包 #apt-get -y update && apt-get -y install unzip zip wget curl  nano sudo ufw socat ntp ntpdate gcc git 三、安裝Caddy 安裝主文件 #curl https://getcaddy.com | bash -s personal 配置 Caddy 文件目錄 #mkdir /etc/caddy #chown -R root:root /etc/caddy #mkdir /etc/ssl/caddy #chown -R root:www-data /etc/ssl/caddy #chmod 770 /etc/ssl/caddy                                  #(770)      只有拥有者,属组用户有读写執行权限;其他用户無权限。 網站目錄 #mkdir -p /var/www/html #chown -R www-data:www-data /var/www 配置文件填充内容 #touch /etc/caddy/Caddyfile #nano /etc/caddy/Caddyfile #chown root:root /etc/caddy/Caddyfile #chmod 644 /etc/caddy/Caddyfile                #(644)      只有拥有者有读写权限;而属组用户和其他用户只有读权限。 偽站安裝 #wget https://github.com/jpalidev/jpalidev.github.io/archive/master.zip #unzip master.zip #cp -rf jpalidev.github.io-master/* /var/www/html 系統服務 #wget https://raw.githubusercontent.com/caddyserver/caddy/master/dist/init/linux-systemd/caddy.ser

V2ray官方脚本純净安裝服務器配置mKCP+BBR加速+云防火墻2019.11.20指令小結

安裝環境 VPS平臺digitalocean 操作系統Debian10 一、常用軟件包 #apt-get -y update && apt-get -y install unzip zip wget curl  nano sudo ufw socat ntp ntpdate gcc git 二、校正時間 查看时间 # date -R 时间设置为UTC+8 首先执行 # rm /etc/localtime 然后执行 #ln -sf /usr/share/zoneinfo/Asia/Shanghai /etc/localtime 三、安裝V2Ray軟件(官方脚本) #bash <(curl -L -s https://install.direct/go.sh) 四、安裝配置文件 #nano  /etc/v2ray/config.json 相關nano指令 剪切刪除行ctrl+k 保存ctrl+0 退出ctrl+x 官網推薦配置生成器 https://intmainreturn0.com/v2ray-config-gen/ 四、啓動運行V2Ray 啓動#systemctl start v2ray 查看狀態# systemctl status v2ray 停止# systemctl stop v2ray 重新加载配置文件# systemctl reload v2ray  五、BBR 修改系统变量 #echo "net.core.default_qdisc=fq" >> /etc/sysctl.conf #echo "net.ipv4.tcp_congestion_control=bbr" >> /etc/sysctl.conf 保存生效 #sysctl -p 查看内核是否已开启BBR #lsmod | grep bbr 返回值有 tcp_bbr 模块即说明 bbr 已启动 六、云平臺防火墻 開啓SSH22TCP端口,V2ray端口UDP 別忘了禁止ICMP,提升安全

Debian10系統防火墻UFW安裝&設置&禁ping&日志記錄案例相關指令小結2019.11.16

環境 VPS平臺digitalocean 操作系統debian10 更新 apt-get -y update 安裝 UFW和編輯器nano apt-get install ufw nano 啓用UFW ufw enable 查看UFW狀態 ufw status verbose 設置初始默認狀態 sudo ufw default deny incoming sudo ufw default allow outgoing 開放常用端口 ufw allow ssh ufw allow http ufw allow https ufw allow dns 設置禁止ping nano /etc/ufw/before.rules 以下内容"ACCEPT" 改爲 "DROP" # ok icmp codes -A ufw-before-input -p icmp --icmp-type destination-unreachable -j DROP -A ufw-before-input -p icmp --icmp-type source-quench -j DROP -A ufw-before-input -p icmp --icmp-type time-exceeded -j DROP -A ufw-before-input -p icmp --icmp-type parameter-problem -j DROP -A ufw-before-input -p icmp --icmp-type echo-request -j DROP 重啓UFW使設置生效 ufw reload 啓用日志,默認級別low ufw logging on 查看日志 nano /var/log/ufw.log 其他指令 重置UFW配置 ufw reset 查看UFW配置文件  nano /etc/default/ufw

WIN10home1809版本手动安装linux子系统Ubuntu8.04LTS全过程2019.11.12指令小结

一、window10设置 设置--》更新和安全--》开发者选项--》开发人员模式 设置--》应用--》程序和功能--》启用或关闭Windows功能--》适用于Linux的Windows子系统 可能提示重启电脑 二、以管理员身份运行Windows PowerShell 1、输入指令 Enable-WindowsOptionalFeature -Online -FeatureName Microsoft-Windows-Subsystem-Linux 2、下载ubuntu18.04LTS Invoke-WebRequest -Uri https://aka.ms/wsl-ubuntu-1804 -OutFile Ubuntu.appx -UseBasicParsing 3、安装 Add-AppxPackage .\Ubuntu.appx 三、开始--》运行ubuntu,设置用户名,密码即可,全部安装完成。 参考: https://docs.microsoft.com/en-us/windows/wsl/install-win10 https://docs.microsoft.com/en-us/windows/wsl/install-manual

AMAZONLightsail 平臺V2Ray三件套一鍵脚本完整安裝指南2019.11.02步驟及指令小結

準備 提前一天注冊一個域名並把域名服務器改爲 Cloudflare nameservers algin.ns.cloudflare.com iris.ns.cloudflare.com 安裝環境 AWS Lightsail 操作系統Debian9.5 一、新建VPS並做cloudflare域名解析(略) 二、下載SSH key,到本地、關閉防火墻,打開所有端口 三、平臺VPS的登錄用戶名admin 四、下SHELL登錄VPS 切換到root用戶 #sudo -i 五、安裝常用軟件包 #apt-get -y update && apt-get -y install unzip zip wget curl  mc  nano sudo ufw socat ntp ntpdate gcc git 六、wulabing一鍵脚本 #bash <(curl -L -s https://raw.githubusercontent.com/wulabing/V2Ray_ws-tls_bash_onekey/master/install.sh) | tee v2ray_ins.log https://github.com/wulabing/V2Ray_ws-tls_bash_onekey 七、加速優化 BBR # wget --no-check-certificate https://github.com/teddysun/across/raw/master/bbr.sh && chmod +x bbr.sh && ./bbr.sh TLS开启OSCP #openssl s_client -connect aw007.ml:443 -status -tlsextdebug < /dev/null 2>&1 | grep -i "OCSP response" TCP fastopen # echo 3 > /proc/sys/net/ipv4/tcp_fastopen ngnix配置加上 tcp_nodelay        on; chrome瀏覽器关闭QUIC协议 1. Chrome

獨特的V2ray動態端口科學上網,能否讓你的VPS難以被識別?2019.10.29指令小結

安裝環境 VPS平臺DigitalOcean   操作系統Debian10 Debian10常用软件包 root用户下安装 #apt-get -y update && apt-get -y install unzip zip wget curl mc nano sudo ufw socat ntp ntpdate gcc git 233一鍵代碼 ,克隆脚本 #bash <(curl -Ls  https://raw.githubusercontent.com/mikewubox/tvonekey/master/v2ray.sh ) 加速優化BBR # wget --no-check-certificate https://github.com/teddysun/across/raw/master/bbr.sh && chmod +x bbr.sh && ./bbr.sh 加速優化TCP fastopen # echo 3 > /proc/sys/net/ipv4/tcp_fastopen

雙雙升級了,新版CentOS8&新版V2Ray三件套一鍵安裝代碼2019.10.24摘要

小結 CentOS8 CentOS 8在2019年9月24日发布,此版本与之前的包库不同,主要分为两个,一个为BaseOS和AppStream,并且开始使用dnf作为管理包的程序。 官網 https://www.centos.org/ V2ray三件套一鍵安裝wulabing版,升級版 2019-10-17 建议遇到问题的用户重置系统后重新安装 变更 添加 Nginx systemd serverfile 修复 又双叒叕尝试修复 Nginx 开机自启动问题 2019-10-16 适配 Centos8 Debian10 Ubuntu19.04 修复 部分系统下 计划任务不生效的问题 修复 时间同步服务 在 Centos8 下无法安装的错误 修复 部分系统下 证书不会自动更新的问题 修复 部分系统下 Nginx 开机自启配置失效的问题 变更 重复安装时,将不对相同的域名进行重复的证书申请,防止出现 Let's encrypt API 次数限制 变更 默认 alterID 64 -> 4 ,减少资源占用 变更 nginx 安装方式从源获取 变更为 编译安装,并使用新版Openssl,支持tls1.3 变更 nginx 配置文件 ssl_protocols ssl_ciphers,适配 tls1.3 变更 取消对Debian8 Ubuntu 16.04 的适配工作(本版本可能依旧可用) 变更 默认页面伪装为 html5 小游戏 新增 安装完成,节点配置信息留档 新增 使用自定义证书 新增 链接方式导入导入 新增 二维码方式导入 https://github.com/wulabing/V2Ray_ws-tls_bash_onekey centos8 常用软件包 #yum -y update && yum -y install unzip zip wget nano sudo curl firewalld redhat-lsb epel-release socat  gcc git BBR加速 # wget --no-check-certificate https://github.com/teddysun/across/raw/master/bbr.sh &am

V2Ray官方脚本手動安裝三件套,Nginx偽站點+WS+TLS+CDN指令小結2019.10.21

配置文件參考https://github.com/mikewubox/V2Ray3 偽站點網頁計算器https://github.com/dunizb/sCalc 安裝環境Digitalocean Debian10 免費域名freenom 免費CDN Cloudflare SSH工具 Xshell SFTP工具 WINSCP 零、建VPS並解析域名到VPS IP 一、安裝常用軟件包 #apt-get update && apt-get install unzip zip wget curl  mc  nano sudo ufw socat ntp ntpdate gcc git 二、時間校正(有人説可省略) 时间设置为UTC+8 首先执行 rm /etc/localtime 然后执行 ln -s /usr/share/zoneinfo/Asia/Shanghai /etc/localtime 三、安裝ngnix+為站點 安裝 #apt install nginx 停止nginx #service nginx stop 偽站點安裝 #rm -rf /home/wwwroot && mkdir -p /home/wwwroot && cd /home/wwwroot #git clone https://github.com/dunizb/sCalc.git 伪站点文件路徑 root  /home/wwwroot/sCalc 四、安裝V2Ray官方脚本 #bash <(curl -Ls https://install.direct/go.sh) 五、TLS證書(參考V2官網) # curl  https://get.acme.sh | sh #source ~/.bashrc 生成ECC证书: # sudo ~/.acme.sh/acme.sh --issue -d XXX007.ml --standalone -k ec-256 将ECC证书和密钥安装到 /etc/v2ray 中 $ sudo ~/.acme.sh/acme.sh --installcert -d XXX007.ml --fullchainpath /etc/v2ray/

當下環境科學上網工具與VPS的選擇2019.10.16

6月,9月两次大整治,靠谱的科学上网工具 1,V2Ray三件套, https://github.com/v2ray/v2ray-core 2,Trojan, https://github.com/trojan-gfw/trojan 靠谱的VPS 1,DigitalOcean,免费浮动IP,免费云防火墙,按小时计费,先用后缴费(一个月缴费一次) 现在注册DigitalOcean云主机VPS送$50刀 注册 https://m.do.co/c/927b03987854           https://geni.us/mydo 2,Linode,原VPS可跨机房全球,迁移按小时计费,先用后缴费(一个月缴费一次) 现在注册LinodeVPS送$20 注册链接https://www.linode.com/?r=fb91098dd0609214db8afb407122e453d9cbfbaa https://geni.us/lino 某英文Linux大神的$20优惠码promotion(必填)EGEE19 3,AWS Lightsail 名牌大厂,实惠,免费换IP,免费云防火墙,按小时计费,先用后缴费(一个月缴费一次) 流量双向计费 。 https://aws.amazon.com 如果你注册DO,LINO后用了半年以上,我将收到一些推荐费,你不会增加额外费用。这不是国内商家加价推销吃回扣。

免費頂級域名與低價頂級域名注冊網址2019.10.06

图片
一、免費域名 www.freenom.com 目前注冊難度大大增加 二、低價域名$0.99/首年+隱私保護 www.namesilo.com

申請一個免費實用可靠的SSL/TLS證書,防止證書被劫持僞造相關網址小結

相關視頻 https://youtu.be/kiniBh16VMY 一、簡單、實用、免費 https://letsencrypt.org/ 二、好用的第三方客戶端acme.sh https://github.com/Neilpang/acme.sh 三、申請證書圖文教程 https://guide.v2fly.org/advanced/tls.html 四、證書防劫持僞造措施 添加CAA記錄 五、證書查詢網址 https://transparencyreport.google.com/https/certificates https://crt.sh/

Trojan-GFW木馬安裝相關指令小結2019.10.05

相關視頻 https://www.youtube.com/watch?v=wP3VQ-sfTb4 安裝環境 DigitalOcean Debian10 VPS 中電信100M光纖 客戶端WIN10專業版 安裝準備:一個域名並解析到VPS IP                    為域名申請好TLS證書密鑰 相關安裝工具:XSELL6                            WINSCP5.15.6 安裝指令: 一、常用安裝包 #apt-get update && apt-get install unzip zip wget curl  mc   nano sudo ufw socat ntp ntpdate gcc git 二、BBR加速 # wget --no-check-certificate https://github.com/teddysun/across/raw/master/bbr.sh && chmod +x bbr.sh && ./bbr.sh 三、安裝trojan #sudo apt install trojan 四:服務器配置文件 具體見https://trojan-gfw.github.io/trojan/config 五、 啓動trojan服務 # systemctl start trojan # systemctl enable trojan 六、客戶端WIN10 https://github.com/trojan-gfw/trojan/releases/download/v1.13.0/trojan-1.13.0-win.zip 補丁包Windows (>=Vista) https://aka.ms/vs/16/release/vc_redist.x64.exe

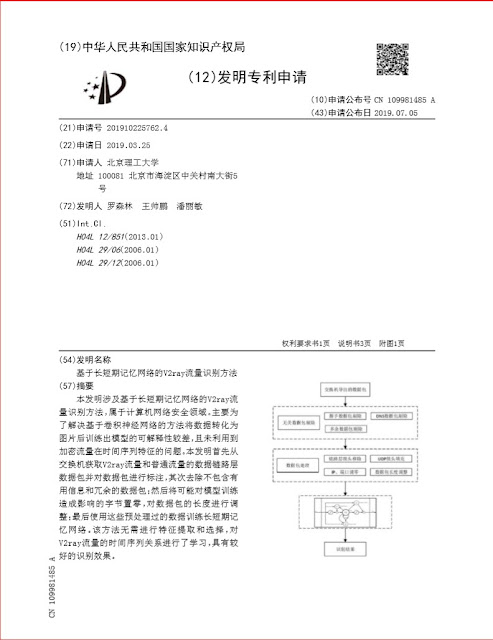
V2ray流量識別發明專利申請公示文件2019.09.25

图片

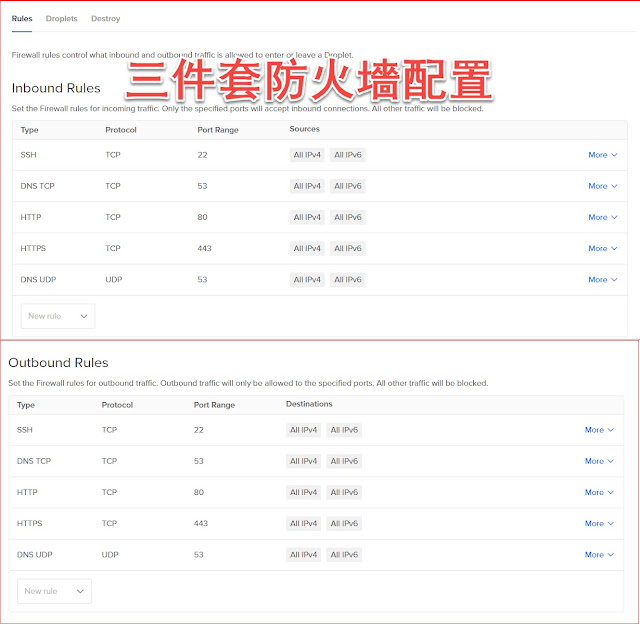
DigitalOcean云防火墻cloudFirewalls配置V2ray三件套2019.09.24

图片
視頻網址 https://www.youtube.com/watch?v=udaRRh-BeOU 這是V2ray三件套防火墻配置需要開放的端口清單。 一、 登錄digitalocean后    二、給防火墻取個名字,添加inbound和outbound規則,並把規則添加應用到相關VPS

给VPS的域名+TLS证书+CDN,给VPS增加floating浮动IP2019.09.18

图片
系统Debian10,三个措施目前均是免费的。 一、为域名增加Let's Encrypt签发的TLS证书 为仅申请安装域名证书(无网站,无WEB软件情况) #wget  https://get.acme.sh | sh #acme.sh --issue --standalone -d example.com 二、为域名添加CDN,这里是指Cloudflare 域名服务器修改为Cloudflare algin.ns.cloudflare.com iris.ns.cloudflare.com 添加A解析,把域名解析到VPS IP 三、为VPS增加浮动floatingIP,这样VPS就有2个不同网段的公网IP地址 目前免费的只有DigitalOcean平台

ChinaTelecom中國電信全球CN2GIA業務與MPLS-VPN簡介2019.09.09

图片
所有圖片資料來自網上和中囯電信全球各網站。 一、CN2GIA CN2全球節點 CN2全球網絡圖 二、MPLS VPN組網簡圖

LinuxVPS监测流量三个工具指令小结20190831

视频地址 https://www.youtube.com/watch?v=K6EtWArdS6k 演示平台digital ocean 演示系统Debian10 以root用户登录VPS 安装常用软件包 #apt-get update && apt-get install unzip zip wget rsync mc vim sudo curl ufw socat ntp 一、监测VPS总流量 安装 #apt-get install nload 运行 #nload 二、按进程或程序实时统计流量 安装 #apt-get install nethogs 运行 #nethogs 三、监控网卡的实时流量来源&去向IP地址,网址 安装 #apt-get install iftop 运行 #iftop

LinuxVPS病毒木马而已软件系统漏洞后门查杀三工具命令小结2019.09.02

视频网址 https://www.youtube.com/watch?v=duyF8-J2u_4 演示平台digital ocean 演示系统Debian10 以root用户登录 常用软件包安装 #apt-get update && apt-get install unzip zip wget rsync mc vim sudo curl ufw socat ntp 一、clamav 安装 #apt-get install clamav clamav-daemon clamav-freshclam 病毒库会24小时内自动更新 手动查杀 某个文件# clamscan 文件名 文件夹 # clamscan  /home 文件夹及子目录#clamscan  -r  /etc VPS所有文件夹及子目录#clamscan  -r  / 二、Chkrootkit 安装 #apt-get install chkrootkit 查杀 #chkrootkit 三、Rootkit Hunter 安装 #apt-get  install rkhunter 查杀 #rkhunter -c 参数c指Check the local system

VPS双向防火墙的设置debian10指令小结2019.08.24

以DigitalOcean debian10系统为例 相关视频 https://www.youtube.com/watch?v=CnB-J_bgOTk 安装常用包 #apt-get update && apt-get install unzip zip wget rsync mc vim sudo curl ufw socat ntp 安装UFW #sudo apt-get install ufw 启用UFW系统启动时自动开启 #sudo ufw enable 关闭所有外部对本机的双向访问 #sudo ufw default deny outgoing #sudo ufw default deny incoming 开放连入端口inbound #sudo ufw allow 22 开放连出端口outbound #sudo ufw allow out 22 禁用端口,如533 #sudo ufw delete allow 533 #sudo ufw delete allow out 533 查看防火墙状态 #sudo ufw status 关闭防火墙  #sudo  ufw disable 防火墙,建议在服务器搭建完成后,安装设置。

V2ray基于Nginx的神器WS+TLS+伪装网站+CDN相关指令小结

图片
视频网址https://www.youtube.com/watch?v=HPWkCZDR3Pc 提前1天的准备工作(因为域名解析需要24小时生效) 注册域名do007.ml 把域名解析到VPS 一、平台与系统 DigitalOcean  debian10 二、相关指令 更新软件源 #apt-get update 安装常用软件包 #apt-get install unzip zip wget rsync mc vim sudo curl ufw socat ntp ntpdate 三、 wulabing 大神一键安装脚本  Vmess+websocket+TLS+Nginx+Website bash <(curl -L -s https://raw.githubusercontent.com/wulabing/V2Ray_ws-tls_bash_onekey/master/install.sh) | tee v2ray_ins.log 四、时间校正指令,与东八区同步 查看系统时间 #date -R #rm /etc/localtime #ln -sf /usr/share/zoneinfo/Asia/Shanghai /etc/localtime

翻墙加速LinuxVPS基本指令15条Debian10系统版本操作2019.08.02

*Debian版本查看 lsb_release -a *Linux内核版本查看 uname -a(Debian查看版本当前操作系统内核信息) *查看CPU lscpu *查看硬盘空间 df -h *显示内存大小 free -m free [-b-k-m] [-o] [-s delay] [-t] [-V] 参数: -b -k -m:分别以字节(KB、MB)为单位显示内存使用情况。 -s delay:显示每隔多少秒数来显示一次内存使用情况。 -t:显示内存总和列。 -o:不显示缓冲区调节列。 *查看系统时间 $ date -R 首先执行 rm /etc/localtime 然后执行 ln -sf /usr/share/zoneinfo/Asia/Shanghai /etc/localtime *查看IP地址 请输入ip addr show 用户系统 *切换到root用户 sudo -i *文件系统 /root  用户root的$HOME目录 /etc  全局的配置文件存放目录。 /usr:用户的很多应用程序和文件都放在这个目录下 /usr/local 安装本地程序的一般默认路径。 /var  这个目录中存放着在不断扩充着的东西,我们习惯将那些经常被修改的目录放在这个目录下。包括各种日志文件。 /bin  bin是Binary的缩写, 这个目录存放着最经常使用的命令 ls,cd,pwd,whoami cd / 更新软件源 apt-get update 安装常用软件 apt-get install curl apt-get install unzip zip wget rsync mc vim sudo curl ufw  apt-get install curl BBR状态查看 lsmod | grep bbr 使用root用户登录,运行以下命令 # wget --no-check-certificate https://github.com/teddysun/across/raw/master/bbr.sh && chmod +x bbr.sh && ./bbr.sh *安全 防止扫描账户密码 apt-get i

查询VPN/VPS公司注册地在美国香港中国的相关公司信息网站

香港注册公司信息查询 https://www.icris.cr.gov.hk 中国注册公司查询 http://www.gsxt.gov.cn/index.html 美国证监会 https://www.sec.gov/ 美国各州工商注册信息查询 英文州名      州名缩写             中文州名              查询网址 Alabama         AL               阿拉巴马州            http://sos.alabama.gov/government-records/business-entity-records Alaska                    AK               阿拉斯加州          https://www.commerce.alaska.gov/ ... arch.aspx?mode=Corp Arizona                AZ                亚利桑那州            http://ecorp.azcc.gov/Search Arkansas               AR                阿肯色州              http://www.sos.arkansas.gov/corps/search_all.php California             CA                加利福尼亚州          https://businesssearch.sos.ca.gov/ Colorado               CO                科罗拉多州            https://www.sos.state.co.us/biz/BusinessEntityCriteriaExt.do Connecticut           CT                康涅狄格州            http://www.concord-sots.ct.gov/C ... nquiry&eid=9740 Delaware              DE                特拉华州    ht tps://icis.corp.d