V2Ray官方脚本三件套手動安裝,基於Apache偽站點+WS+TLS+CDN2019.12.06指令小結
安裝環境
VPS平臺digitalocean
操作系統debian10
一、新建VPS,注冊域名並解析好(略)
二、常用軟件包
#apt-get -y update && apt-get -y install unzip zip wget curl nano sudo ufw socat ntp ntpdate gcc git
三、安裝Apache
安裝主文件
#apt install -y apache2
# 开启以下module
#a2enmod ssl proxy proxy_wstunnel proxy_http rewrite headers
停止apache2,不停會占用80端口,影響證書申請
#systemctl stop apache2
偽站安裝
#wget https://github.com/jpalidev/jpalidev.github.io/archive/master.zip
#unzip master.zip
#cp -rf jpalidev.github.io-master/* /var/www/html
配置 Apache
#nano /etc/apache2/sites-available/v2ray.conf
四、安裝V2RAY
#bash <(curl -Ls https://install.direct/go.sh)
配置文件
#nano /etc/v2ray/config.json
五、TLS證書
#curl https://get.acme.sh | sh
安装成功后执行
#source ~/.bashrc
以确保脚本所设置的命令别名生效。
生成ECC证书:
#sudo ~/.acme.sh/acme.sh --issue -d ggg777.ml --standalone -k ec-256
将ECC证书和密钥安装到 /etc/v2ray 中
#sudo ~/.acme.sh/acme.sh --installcert -d ggg777.ml --fullchainpath /etc/v2ray/v2ray.crt --keypath /etc/v2ray/v2ray.key --ecc
查看证书位置 find / -name *ggg777*
六、加速優化
BBR
修改系统变量
echo "net.core.default_qdisc=fq" >> /etc/sysctl.conf
echo "net.ipv4.tcp_congestion_control=bbr" >> /etc/sysctl.conf
保存生效
sysctl -p
查看内核是否已开启BBR
sysctl net.ipv4.tcp_available_congestion_control
sysctl net.ipv4.tcp_congestion_control
#lsmod | grep bbr
返回值有 tcp_bbr 模块即说明 bbr 已启动
七、啓動Apache,V2RAY,
啓動 Apache:
#a2ensite v2ray
#systemctl start apache2
#systemctl status apache2
啓動
# systemctl start v2ray
#systemctl status v2ray
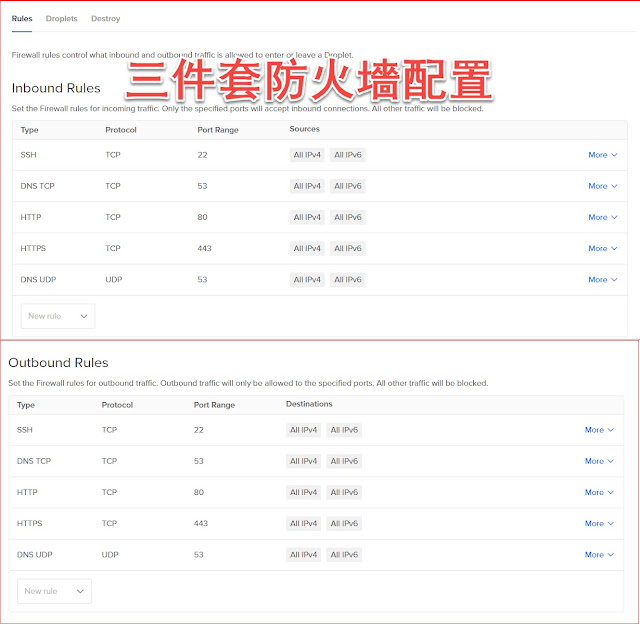
八、云防火墻(開22端口TCP,80端口TCP,443端口TCP,53端口TCP,UDP)
套CDN,略。。。
相關配置參考https://github.com/mikewubox/V2Ray3
最後參考見並感謝,
https://httpd.apache.org/docs/2.4/howto/reverse_proxy.html
https://xzos.net/websockettlscdnweb-apache2-deploys-v2ray/
https://blog.wizardsoftheweb.pro/lets-encrypt-from-start-to-finish-openssl-tuning/

请问下证书怎么自动续签?
回复删除已经自动续签
删除请问一下apache2会占用80端口,这样子续签不会出问题嘛
删除你好,请问我有多个域名同时指向同一个IP地址的VPS,申请证书时是否每个域名都要单独申请?我申请了其中一个,另外两个申请时就出错
回复删除